Last updated: April 23, 2024
How to activate data observability for Snowflake
Read this guide to learn how to connect DQOps to Snowflake from the UI, command-line interface, or directly in YAML files, and activate monitoring.
Overview
Snowflake is a cloud-based data warehouse that separates storage from compute resources and requires little maintenance.
Prerequisite credentials
To add Snowflake data source connection to DQOps you need a Snowflake account.
By default, Snowflake instances are open to any IP address unless you configure network policies that restrict this communication. In case of restrictions you need to add the IP address used by DQOps to Allowed IP Addresses in Snowflake Network Policies.
Add Snowflake connection using the user interface
Navigate to the connection settings
To navigate to the Snowflake connection settings:
-
Go to the Data Sources section and click the + Add connection button in the upper left corner.

-
Select Snowflake database type.

Fill in the connection settings
After navigating to the Snowflake connection settings, you will need to fill in its details.
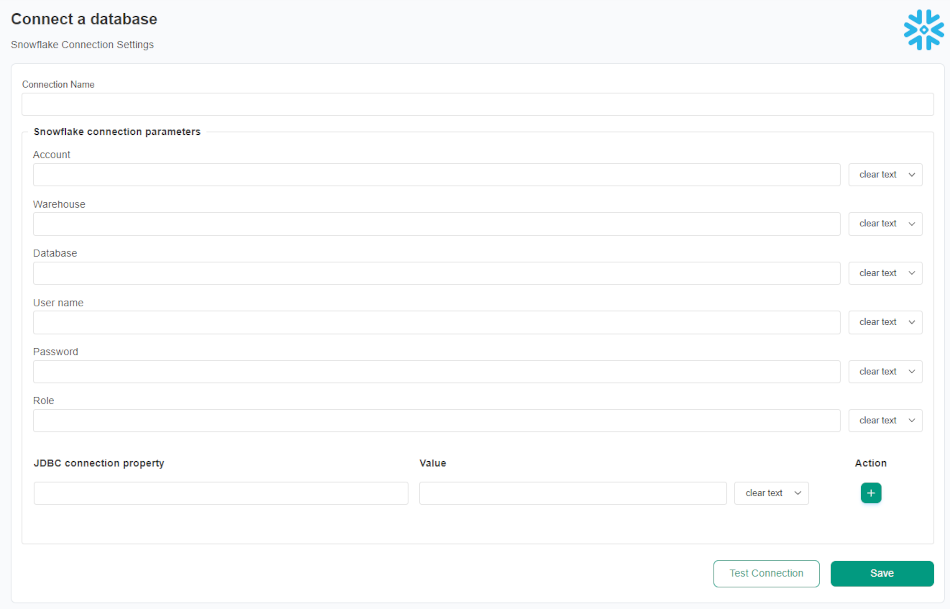
| Snowflake connection settings | Property name in YAML configuration file | Description |
|---|---|---|
| Connection name | The name of the connection that will be created in DQOps. This will also be the name of the folder where the connection configuration files are stored. The name of the connection must be unique and consist of alphanumeric characters. | |
| Account | account |
Snowflake account name, e.q. <account>, <account>-<locator>, <account>.<region> or <account>.<region>.<platform>. Supports also a ${SNOWFLAKE_ACCOUNT} configuration with a custom environment variable. |
| Warehouse | warehouse |
Optional setting. Snowflake warehouse name. Supports also a ${SNOWFLAKE_WAREHOUSE} configuration with a custom environment variable. |
| Database | database |
Snowflake database name. The value can be in the ${ENVIRONMENT_VARIABLE_NAME} format to use dynamic substitution. |
| User name | user |
Snowflake user name. The value can be in the ${ENVIRONMENT_VARIABLE_NAME} format to use dynamic substitution. |
| Password | password |
Snowflake database password. The value can be in the ${ENVIRONMENT_VARIABLE_NAME} format to use dynamic substitution. |
| Role | role |
Optional setting. Snowflake role name. Supports also ${SNOWFLAKE_ROLE} configuration with a custom environment variable. |
| JDBC connection property | Optional setting. DQOps supports using JDBC driver to access Snowflake. See the Snowflake documentation for JDBC connection parameter references. |
DQOps allows you to dynamically replace properties in connection settings with environment variables. To use it, simply change "clear text" to ${ENV_VAR} using the drop-down menu at the end of the variable entry field and type your variable.
For example:

To add optional JDBC connection properties, just type the JDBC connection property and the Value. The value can be in the ${ENVIRONMENT_VARIABLE_NAME} format to use dynamic substitution.
For example:

To remove the property click on the trash icon at the end of the input field.
After filling in the connection settings, click the Test Connection button to test the connection.
Click the Save connection button when the test is successful otherwise, you can check the details of what went wrong.
Import metadata using the user interface
-
Import the selected data resources (source schemas and tables) by clicking on the Import Tables button next to the name of the source schema from which you want to import tables.

-
Select the tables you want to import or import all tables using the buttons in the upper right corner.

When new tables are imported, DQOps automatically activates profiling and monitoring checks, such as row count, table availability, and checks detecting schema changes. These checks are scheduled to run daily at 12:00 p.m. By clicking on the Advisor at the top of the page, you can quickly collect basic statistics, run profiling checks, or modify the schedule for newly imported tables.

Add Snowflake connection using DQOps Shell
To add a connection run the following command in DQOps Shell.
Fill in the data you will be asked for.
Connection name (--name): connection1
Database provider type (--provider):
 [ 1] bigquery
 [ 2] databricks
 [ 3] mysql
 [ 4] oracle
 [ 5] postgresql
 [ 6] duckdb
 [ 7] presto
 [ 8] redshift
 [ 9] snowflake
 [10] spark
 [11] sqlserver
 [12] trino
Please enter one of the [] values: 9
Snowflake account name (--snowflake-account) [${SNOWFLAKE_ACCOUNT}]: xx-kh8138
Snowflake warehouse name (--snowflake-warehouse) [${SNOWFLAKE_WAREHOUSE}]: OMPUTE_WH
Snowflake database name (--snowflake-database) [${SNOWFLAKE_DATABASE}]: TESTING
Snowflake user name (--snowflake-user) [${SNOWFLAKE_USER}]: john
Snowflake user password (--snowflake-password) [${SNOWFLAKE_PASSWORD}]: xxx
Connection connecton1 was successfully added.
Run 'table import -c=connection1' to import tables.
You can also run the command with parameters to add a connection in just a single step.
dqo> connection add --name=connection1
--provider=snowflake
--snowflake-account=xx-kh8138
--snowflake-warehouse=COMPUTE_WH
--snowflake-database=TESTING
--snowflake-user=john
--snowflake-password=xxx
After adding connection run table import -c=connection1 to select schemas and import tables.
DQOps will ask you to select the schema from which the tables will be imported.
You can also add the schema and table name as a parameter to import tables in just a single step.
DQOps supports the use of the asterisk character * as a wildcard when selecting schemas and tables, which can substitute any number of characters. For example, use pub* to find all schema a name with a name starting with "pub". The * character can be used at the beginning, in the middle or at the end of the name.
Connections configuration files
Connection configurations are stored in the YAML files in the ./sources folder. The name of the connection is also
the name of the folder where the configuration file is stored.
Below is a sample YAML file showing an example configuration of the Snowflake data source connection.
apiVersion: dqo/v1
kind: source
spec:
  provider_type: snowflake
  snowflake:
    account: xx-kh8138
    warehouse: COMPUTE_WH
    database: TESTING
    user: john
    password: xxx
    role: ACCOUNTADMIN
    properties:
      CLIENT_SESSION_KEEP_ALIVE_HEARTBEAT_FREQUENCEY: 3500
  incident_grouping:
    grouping_level: table_dimension_category
    minimum_severity: warning
    max_incident_length_days: 60
    mute_for_days: 60
Reference of all connection parameters
Complete documentation of all connection parameters used in the spec.snowflake node is
described in the reference section of the SnowflakeParametersSpec
YAML file format.
Next steps
- We have provided a variety of use cases that use openly available datasets from Google Cloud to help you in using DQOps effectively. You can find the full list of use cases here.
- DQOps allows you to keep track of the issues that arise during data quality monitoring and send alert notifications directly to Slack. Learn more about incidents and notifications.
- The data in the table often comes from different data sources and vendors or is loaded by different data pipelines. Learn how data grouping in DQOps can help you calculate separate data quality KPI scores for different groups of rows.